Showing posts with label project of the month. Show all posts

02 April 2014

DIY Carseat Recover


This project has been on my to do list for almost a year.  I am crazy excited that I've finally done it!  It was definitely a challenge.  It wasn't really that hard of a project, but what made it difficult was the bulkiness and thickness of it once it was close to being back together.

Here's how it all went down...


I took the cover off and studied it.  I also took lots of pictures as I needed to be able to put it back together once it was all ripped apart!


My plan going in was to rip it apart, piece by piece, discard the old, pink fabric and sew the new fabric onto the padding.  Upon studying the cover, it seemed most feasible to start with the brown fabric that went all the way around and actually folds over the seat with elastic to keep it on.  You can barely see a sliver of brown on the outsides of the seat in the above photo.  There is dark brown bias tape that is sewn across the front on the bottom, then it connects to the elastic with the brown from there and wraps all the way around and down to the other side.  I noticed that this piece was still in pretty good shape, that it matched my new fabric, and would save me a ton of time if I kept it intact and didn't replace it.  So that's what I did!  Then once I took that piece off I decided to work my way to the center in taking it apart.


Here is a picture after the stretch material with elastic was taken off.  Look at the color difference!  I think this seat was more than ready for a face lift!  At this point I also realized that this cover didn't actually have fabric to remove from the padding.  The padding was printed!  I was happy to realize this because this meant I would save even more time.  Instead of ripping the old fabric off the padding, I would be sewing the new fabric directly onto it.

Saving time is always a plus, especially if you happened to have lost your seam ripper over a year ago and somehow completely forget to buy a new one every single time you're in the store.  Seriously.  Every time.  So what I do, without a ripper, is just pull the material apart at the seam until it stops, then use my big scissors to clip the next couple threads, pull it apart again, and so on.  


Once I had all the pieces ripped apart I laid them out on the new fabric as a pattern.  


Used some pins to make sure they didn't move around while I was cutting.  On a side note, if working while your 20 month old is awake and toddling around, do not leave the pins on the edge of the table thinking that they are close enough to you to rescue if he gets it in his mind to investigate.  Because he will.  And his chubby little fingers will move faster than you thought possible, resulting in finding yourself two minutes later, on your hands and knees, picking up every. single. one. off the floor.  


Once I had them all stuck, I cut them out.  


I started getting excited with this step, seeing the new fabric on the shapes.  I love new fabric.


Now we're getting somewhere!  The next step I did was to sew a zigzag stitch all around the pieces, just so it wouldn't slip out of place as I was sewing the pieces back together.  I liked not having to worry about my seam allowance.  Since I could see where it had already been sewn together, I just had to make sure I stayed beside that line.  Then when sewing the pieces together it was like I already had a guide in place.
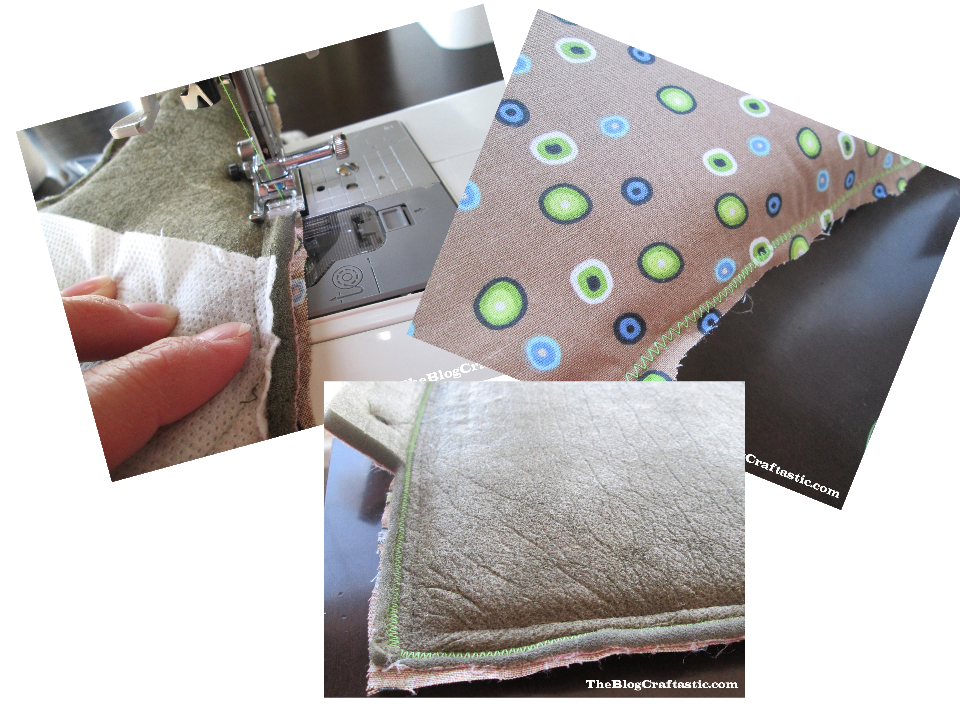

This part was a little tricky.  I originally thought I would have to sew buttonholes into the new fabric, but that's not what I ended up doing.  I realized it was much simpler to just sew a really tight zigzag stitch around the holes, then just cut the slit open.  Now, if you are an accomplished seamstress, or even an intermediate level, please be kind as you see the next few pics.  I realize they are not the neatest thing ever.  I will blame part of it on the fact that with the seat cover being so bulky it was very hard to see what I was doing and hard to make nice and neat stitching lines.  That said, I blame the rest of it on the fact that even after having my own sewing machine for a few years, I am still very much a beginner sewer!  So here we go:
I sewed it on my machine with the right side down, so that I could see where the hole was to sew around it.


Then folded it in half so that I could use my scissors to snip a hole.


Then I unfolded it and cut up to the stitching on both sides.


These tiny holes were really tricky to get neat....as you can tell.  This was the neatest one I did, if that tells ya anything.


Now I had all the fabric sewn on and all the holes made.  I was down to the last step of sewing it all back together and so excited to see the final result!


A little too excited, possibly.  This was not the easiest sewing I've ever done, due to the bulkiness of the cover.  I held it together as best I could, and sometimes it seemed like I was just shoving it under the needle.  My machine did something here and it scared the shnickles out of me.  In about .2 seconds I envisioned my hand being mangled under the needle and I jumped about a foot, jerking my hand back, and catching it on a pin.


After I calmed down I sewed all the sides together, then worked in the reverse order of how I took it apart.  


Oh, and remember how I said I got all the holes sewn and cut?  Yeah, not so much.  When I finished the cover I excitedly got the seat out and started putting the cover on, only to realize there were no holes for the belt to come up through.  Back to the machine.  Did the two last holes and THEN it was finished!


My intent in doing this was so that my little boy didn't have to ride around in a pink butterfly car seat (even though at 1-2 years old he could really care less).  When I finished it and asked my 4 year old if she liked it she said, "It looks like a girl seat".  Ah, oh well.  Better than the dirty butterflies, anyway.  

It turned out to be a lot harder than I thought as far as trying to sew something so bulky, and yet it was really quite simple.  So that's it!  Looks like a brand new seat!


03 February 2014

DIY Chalk Board Paint Success!


Ever since DIY chalkboard paint came on the scene I have been wanting to try it out.  I finally was able to a few months ago!  I have this little cake pop business that I might have mentioned on here once or twice or a million and three times.  I did a craft show back in November, and it was my very first large show so my entire set up was all new.  I needed a couple signs.  One to state my shop's name and prices, and one for my "Man Pop" display.  

I really liked the idea of using chalkboards because I like the look of them and also because they are able to be re-used and re-purposed for many different things. In fact, we just used the large chalkboard this morning for one of our homeschool exercises.

I think it also reminds me of my childhood.  I had a little play area with a pretty large chalkboard.  I played school, played games, and created oodles of chalk art.  Does anyone say "oodles"?  If they don't, they should.

The recipe I used was a very simple one.  Being a busy mom, "simple" is my favorite word.  And when you put DIY in there too, I'm all in.  Here's how it goes:


What you need:
1. Something to paint
2. An empty container for the paint
3. Sponge brushes
4. Black paint (or any color you want)
5. Non-Sanded Tile Grout

A lot of people get excited about going to the mall, Target, or Ikea.  However, my day gets 100% better with a trip to Salvation Army or Goodwill.  I know, classy right?  But seriously, nothing gets the creative juices rushing through my brain than walking the aisles of the consignment stores and looking at everyone else's junk.  

For the chalkboards I had kind of an idea of what I wanted going in.  When my eye caught this old wooden tv tray I grabbed it without a moment's thought.  It was perfect!  I also found this picture that was also a chalkboard.  It just needed sprucing up.

Start by mixing up your paint.  I knew a little bit would go a long way so I only made 1/2 the recipe.  I will give you the full recipe here.  First, measure out 2 T of grout into your empty container.


Pour in one cup of paint.


Mix it up really good to get rid of any lumps.


As you can see here, what I did filled the container about halfway, so a full recipe would yield about 16 oz, give or take.  This is where it really starts to get fun!  Start painting your piece with your really rad chalkboard paint!


Here's the first coat.  I like using the sponge brushes because you don't have to worry about getting brush strokes in your paint.  It paints on nice and slick!


I was really surprised at how quickly the paint dried, too.  I could have done the second coat a mere 20-30 minutes later, but dinner and bedtime routines for three little rascals sort of got in the way.  Hence the horrible picture under really bad light.  But you get the gist.


I almost forgot to take a picture of this chalkboard before it was done.  Love the before and after you can see here!


And the finished product!  I really didn't like how I wrote up this sign, but I literally didn't have the time to erase it and try again.  I was completely down to the wire with this show and didn't have even one minute to spare.  However, the chalkboard itself turned out really good!


And the smaller chalkboard.


If you've been meaning to try out the chalkboard paint thing, now is the time!  Grab an old tray, a wooden box, a glass vase, and paint away!  The possibilities are endless!  You could even turn a wall in your house into a gigantic chalkboard!  Just don't tell your landlord (or your husband) that it was me who suggested it.


01 October 2013

Tri-Color Fleece Blanket


The Project of the Month this month is a no sew blanket with a twist!  I don't think I've ever put up a tutorial on a fleece blanket.  This is surprising since I have made a lot.  I mean, a lot.  Now that the air is getting a little cooler I will hopefully be making more to go up in my etsy shop and maybe I will do a tutorial of one too.  

Here are some I've done:


No sew fleece blankets.  So cute, so cuddly, so professional looking, and so EASY!


These are the standard no sews.  Print fleece on the front, solid color on the back.  Simple.

I recently had a request for a fleece blanket.  When I asked the colors, I was told gray and white chevron, yellow, and muted green.  Three colors.  I started brainstorming.  I didn't want to put two print sides together.  It just looks so much better when one side is print and one is solid, but how was I going to do two solid colors?


Introducing the tri-color fleece blanket.  And yes, it is still a no-sew!  It takes just a couple extra steps than the no sew blanket with two colors.  Here's how:


What you need:
1 yard print fleece fabric
2 coordinating solid colors, 1 yard each.
Fabric shears


Fabric is never cut to exact measurements, so the first thing you want to do is line up your print fabric with your main solid color fabric.  Lay down first the larger piece.  In my case it was NOT the print, so I ended up having to flip it once I had it laid down.  Not a big deal, just easier if you don't have to do that.  Lay it larger side down.


Try to smooth out all the wrinkles so it is lying flat.  This is a VERY forgiving project.  Meaning, nothing has to be exact because once it is all done, you can't see any mistakes!  Love that.


Cut off all the excess so that the fabric pieces are the same size.  If you were just doing one print and one solid color, this is where you would be ready to cut your strips all the way around.  These next few steps are what make this fleece blanket extra special!  A third color to give it a little extra pop!


If your fabric does not have a straight edge, you will need to give it one.  The easiest way I've found to do that is simply to lay the fabric down on top of my already cut edge of the other fabric piece, and follow it as I cut.  You are going to cut a long strip the whole length of the blanket and up the sides about 6 inches or so.


This is how I cut a straight line.  I just cut my straight edge by lining it up with the chevron, so now to cut another straight edge I fold the green up to where I want to cut.  I like my strips to be about 3 to 3 1/2 inches, so I made the strip about double that.


Cut the whole length of the fabric.


Now you should have a strip like this.  Remember what I said about a forgiving project?  It won't even matter that my strip is crazy crooked!  Lay your strip down on the same color and cut out a second strip the same size.


Next you want to do the same exact thing on the ends.


Once you have one end strip, lay it down on the same fabric and cut out a second one the same size.


So now we have our print and one solid color lying together, and we have 2 side strips and 2 end strips of the second solid color.  Now we want to insert the strips into the blanket.  Lift up the top print wide enough to fit in your strip.


Lay down the strip, lining it up with the bottom edge and sides.


Fold the print side flap back down, covering the strip.


You will have to cut two of the strips so that they don't overlap.  


Once you have all four strips nicely tucked up under the top layer of fleece, it's time to cut strips!  I like my strips to be about 3 to 3.5 inches long.  I start in the middle of one side and make my first cut.


Cut an identical, parallel line about 1.5 inches over.  You have your first strip!  Continue cutting these all the way to the corner.


If you cut your strips wide enough, you shouldn't have any trouble but still be aware of where you are cutting.  You don't want to cut that middle piece of fabric all the way to the top!


I cut until I am about 4 to 6 inches from the corner, then I stop.


I then go back to the middle where I started, and start cutting more strips the other way, towards the opposite corner.


Once I get 4 to 6 inches or so from that corner, I stop again.  Continue to do this on all four sides of the blanket.


Oh!  One thing I forgot to mention.  Keep in mind that your strip under the top layer has a cut where the side and the end strips meet.  When you are cutting towards it, make your strips line up so that the slit between strips is the edge of a "tab".  Once you've cut all the way to the corner, go ahead and just cut that corner off.


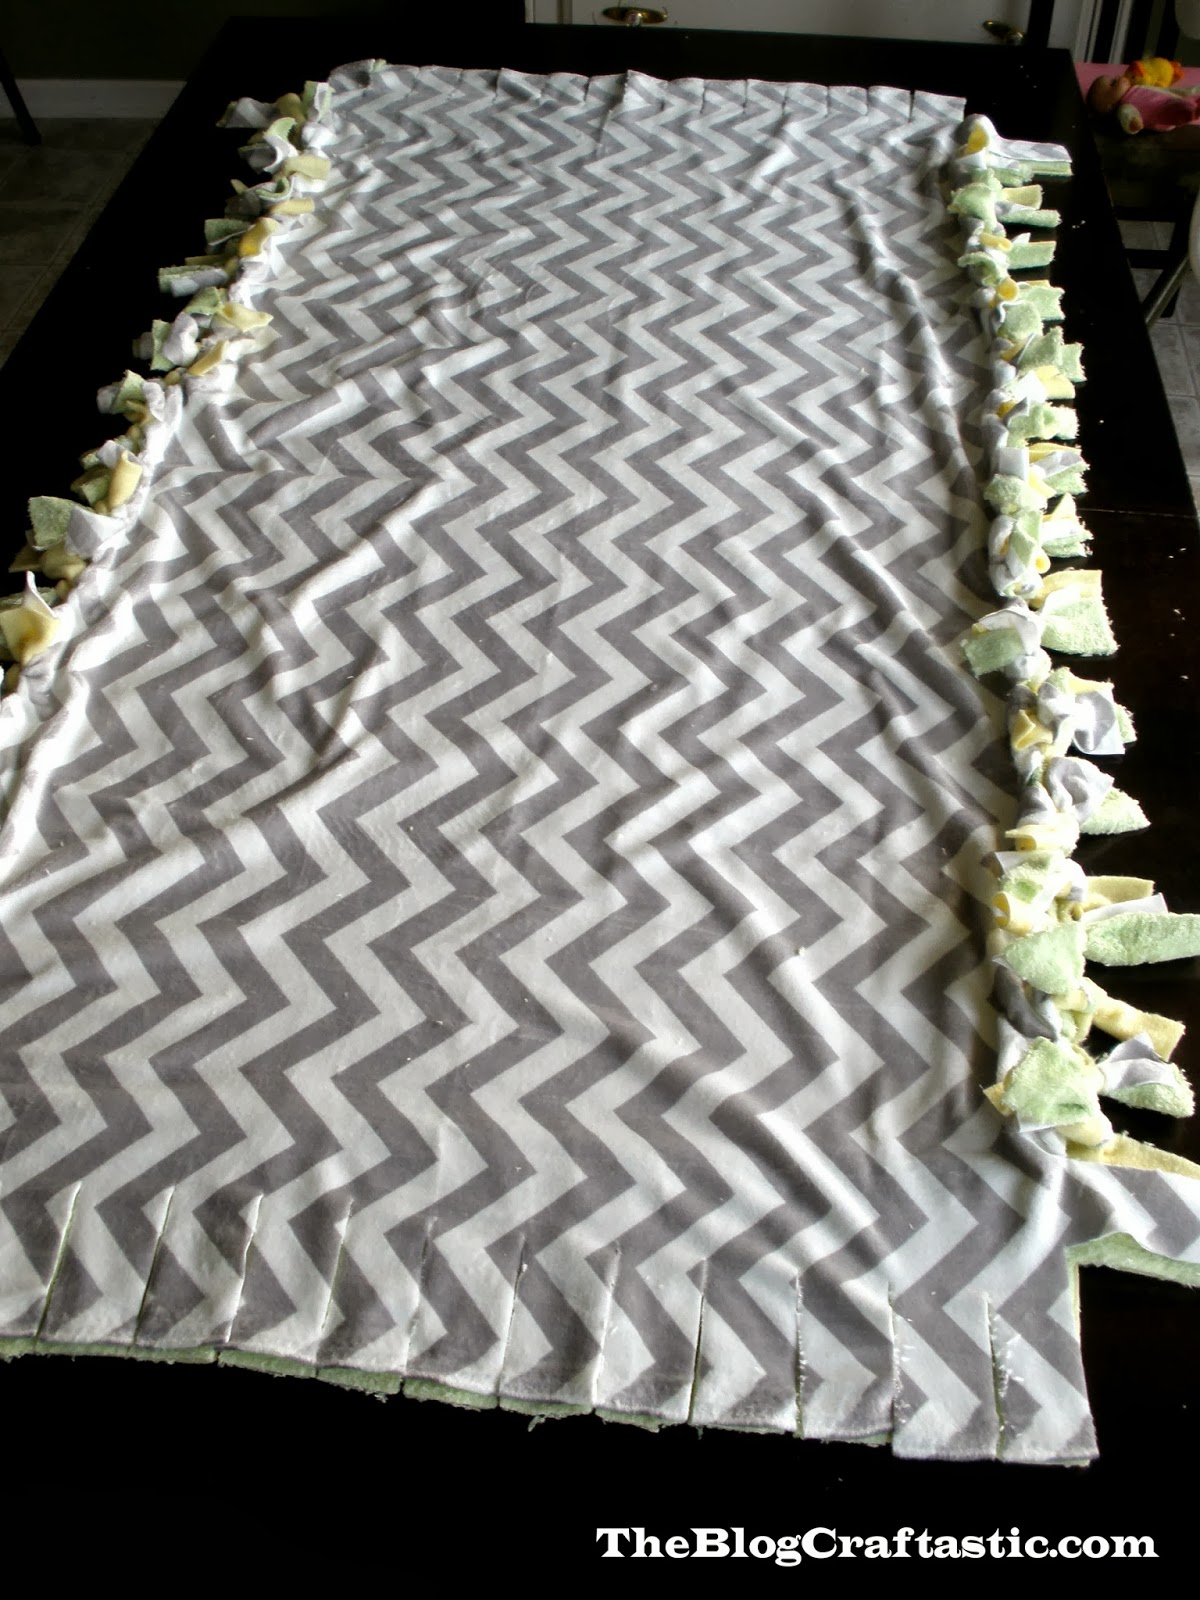
This is what the blanket should look like when you are done cutting all the strips and corners.


Now to start tying!  My yellow fleece seemed to be a bit thick, and the chevron and green were a bit thinner.  So when tying I held the chevron and green together and pretended it was one piece and then I just tied a double knot with the yellow piece!


Like so...


Keep tying each strip together.  I use the same method of starting in the middle of a side and work my way to the corners.  This helps to be able to stretch the fabric and work out wrinkles along the way.


Tie all the way to the corner, then stop with one strip to go.


Repeat on all four sides.


Now that I have the sides done I will do the ends.


Corners can be a little tricky if you let them.  The secret is to keep stretching the fabric as you tie.  Don't worry too much about tearing it a little bit.  Fleece won't fray.


This is what the corner looks like right after you tie it and just before stretching it out.


Here it is after being stretched.


And we're done!


Check out the two colors!  Fits quite perfectly with the chevron, I think.


I've already started doing this technique on a new blanket.  I have yet to decide if I want to put it in the shop or keep it.  It's pretty cute.  


Now go make one of your own!  And please share!  I would love to see them!