.png)
This project has been on my to do list for almost a year. I am crazy excited that I've finally done it! It was definitely a challenge. It wasn't really that hard of a project, but what made it difficult was the bulkiness and thickness of it once it was close to being back together.
Here's how it all went down...

I took the cover off and studied it. I also took lots of pictures as I needed to be able to put it back together once it was all ripped apart!

My plan going in was to rip it apart, piece by piece, discard the old, pink fabric and sew the new fabric onto the padding. Upon studying the cover, it seemed most feasible to start with the brown fabric that went all the way around and actually folds over the seat with elastic to keep it on. You can barely see a sliver of brown on the outsides of the seat in the above photo. There is dark brown bias tape that is sewn across the front on the bottom, then it connects to the elastic with the brown from there and wraps all the way around and down to the other side. I noticed that this piece was still in pretty good shape, that it matched my new fabric, and would save me a ton of time if I kept it intact and didn't replace it. So that's what I did! Then once I took that piece off I decided to work my way to the center in taking it apart.

Here is a picture after the stretch material with elastic was taken off. Look at the color difference! I think this seat was more than ready for a face lift! At this point I also realized that this cover didn't actually have fabric to remove from the padding. The padding was printed! I was happy to realize this because this meant I would save even more time. Instead of ripping the old fabric off the padding, I would be sewing the new fabric directly onto it.
Saving time is always a plus, especially if you happened to have lost your seam ripper over a year ago and somehow completely forget to buy a new one every single time you're in the store. Seriously. Every time. So what I do, without a ripper, is just pull the material apart at the seam until it stops, then use my big scissors to clip the next couple threads, pull it apart again, and so on.

Once I had all the pieces ripped apart I laid them out on the new fabric as a pattern.

Used some pins to make sure they didn't move around while I was cutting. On a side note, if working while your 20 month old is awake and toddling around, do not leave the pins on the edge of the table thinking that they are close enough to you to rescue if he gets it in his mind to investigate. Because he will. And his chubby little fingers will move faster than you thought possible, resulting in finding yourself two minutes later, on your hands and knees, picking up every. single. one. off the floor.

Once I had them all stuck, I cut them out.

I started getting excited with this step, seeing the new fabric on the shapes. I love new fabric.

Now we're getting somewhere! The next step I did was to sew a zigzag stitch all around the pieces, just so it wouldn't slip out of place as I was sewing the pieces back together. I liked not having to worry about my seam allowance. Since I could see where it had already been sewn together, I just had to make sure I stayed beside that line. Then when sewing the pieces together it was like I already had a guide in place.
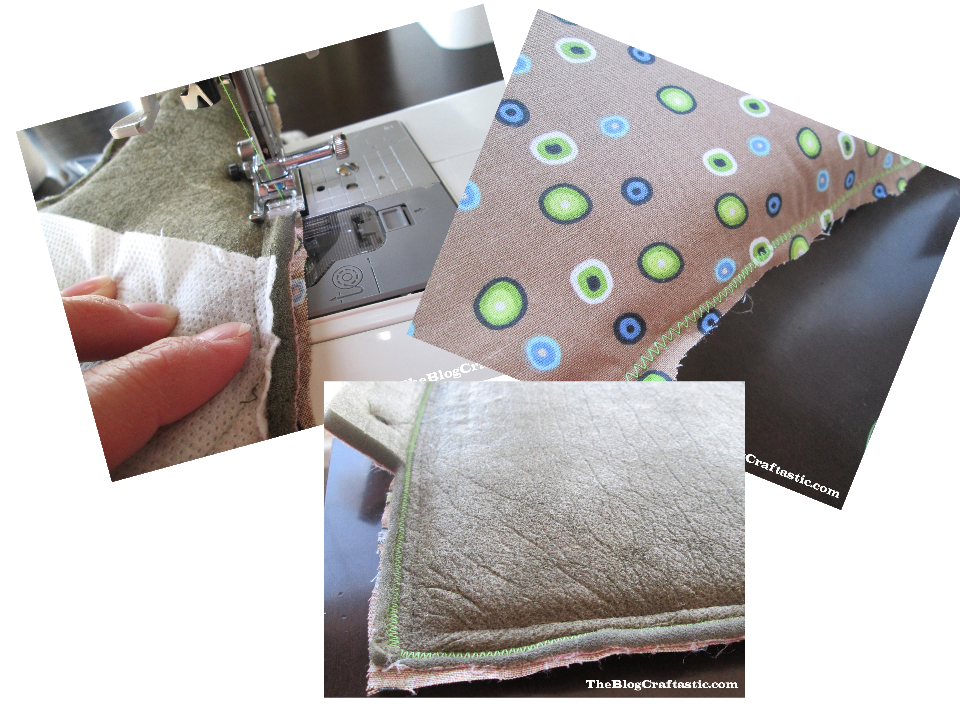
This part was a little tricky. I originally thought I would have to sew buttonholes into the new fabric, but that's not what I ended up doing. I realized it was much simpler to just sew a really tight zigzag stitch around the holes, then just cut the slit open. Now, if you are an accomplished seamstress, or even an intermediate level, please be kind as you see the next few pics. I realize they are not the neatest thing ever. I will blame part of it on the fact that with the seat cover being so bulky it was very hard to see what I was doing and hard to make nice and neat stitching lines. That said, I blame the rest of it on the fact that even after having my own sewing machine for a few years, I am still very much a beginner sewer! So here we go:
I sewed it on my machine with the right side down, so that I could see where the hole was to sew around it.

Then folded it in half so that I could use my scissors to snip a hole.

Then I unfolded it and cut up to the stitching on both sides.

These tiny holes were really tricky to get neat....as you can tell. This was the neatest one I did, if that tells ya anything.

Now I had all the fabric sewn on and all the holes made. I was down to the last step of sewing it all back together and so excited to see the final result!

A little too excited, possibly. This was not the easiest sewing I've ever done, due to the bulkiness of the cover. I held it together as best I could, and sometimes it seemed like I was just shoving it under the needle. My machine did something here and it scared the shnickles out of me. In about .2 seconds I envisioned my hand being mangled under the needle and I jumped about a foot, jerking my hand back, and catching it on a pin.

After I calmed down I sewed all the sides together, then worked in the reverse order of how I took it apart.

Oh, and remember how I said I got all the holes sewn and cut? Yeah, not so much. When I finished the cover I excitedly got the seat out and started putting the cover on, only to realize there were no holes for the belt to come up through. Back to the machine. Did the two last holes and THEN it was finished!

My intent in doing this was so that my little boy didn't have to ride around in a pink butterfly car seat (even though at 1-2 years old he could really care less). When I finished it and asked my 4 year old if she liked it she said, "It looks like a girl seat". Ah, oh well. Better than the dirty butterflies, anyway.
It turned out to be a lot harder than I thought as far as trying to sew something so bulky, and yet it was really quite simple. So that's it! Looks like a brand new seat!
No comments:
Post a Comment